When creating a Workflow App, you can set when a task occurs and when its processing deadline falls. For example, consider a Business Travel Request/Report App: if a task to report on the details of your trip arrives immediately after the trip request is approved, that’s a bit awkward.
There are also cases where you’d want a submission deadline for the trip report. You can tell employees by group chat, email, or verbally that they should submit the report by a certain date, but that’s not very efficient. If you set a deadline on the task itself, Questetra BPM Suite will manage the deadline automatically. In this tutorial, we’ll use Timer Intermediate Events and Human Task deadline settings to build an app that handles a series of business trip-related workflow processes. By making effective use of these features when designing your app, you can create tasks and control deadlines according to a schedule.
However, since this tutorial focuses on how to control the progress of Tokens based on date and time, we’ll build the Travel Request/Report App with the minimum configuration needed. If you actually use this in a real business setting, you’ll likely need to work out conditional branching in the workflow diagram, and to configure the User settings in the Swimlanes.
Advance Preparation
To create the App please refer to the Travel Request App described in the Get Started guide. Create a new App in accordance with the contents of Chpt.2 and Chpt.3 up to the section “Settings related to input values”. Chpt.1 and 2 are almost independent in terms of contents, but the User / Organization registration information prepared in chapter 1 is also used in chapter 2 and thereafter. For Users and Organizations, read as appropriate according to your environment, or prepare new ones by reading chapter 1.
Workflow Diagram
Edit the App you created so that it looks like the diagram below. The round icon labelled “Business Trip Start” is the Timer Intermediate Event. You can find this in the palette of Intermediate Events.

The Timer Intermediate Event is located in the Intermediate Event task palette.

In order to make the App we require it is necessary to set the Human Tasks, so please set the App up like this for the time being. We will touch on the Confirmation Task branch later.
Data Items
Set things up so there are 7 Data Items as shown below. Reuse the data items that have already been configured.
| Data Item Name | Data Type | Field Name | Notes |
| Subject | Text · Single line | ||
| Business Trip Start Date | Date · Year/Month/Day | q_trip_start | The start date from your first step |
| Business Trip End Date | Date · Year/Month/Day | q_trip_end | The end date from your first step |
| Requester | User · Search Select Box | q_trip_user | |
| Request Details | Text · Multi-line | q_purpose | The details from your first step |
| Amount | Number | q_budget | |
| Report Details | Text · Multi-line | q_report |
Data Edit Permissions
Set the permissions as follows.
| Trip Request | Request Confirmation | Content Report | Content Confirmation | |
| Subject | Editable | Display only | Display only | Display only |
| Business Trip Start Date | Editable | Display only | Display only | Display only |
| Business Trip End Date | Editable | Display only | Display only | Display only |
| Requester | Editable | Display only | Display only | Display only |
| Request Details | Editable | Display only | Display only | Display only |
| Amount | Editable | Display only | Display only | Display only |
| Report Details | No display | No display | Editable | Display only |
“Business Trip Start” Settings
The Timer Intermediate Event is an object that pauses the token mid-flow until a specified date and time. By inserting this event in the middle of the workflow diagram you can pause the Case.
This time, we will use the Timer Intermediate Event to prevent the Report Task from occurring until the business trip begins. Set the timer to “Datetime specified by Data Item” in the Settings window and select the Data Item “Business trip start date”. With this, the token will stay on “Business Trip Start” until the date which has been entered at the Travel Application task.
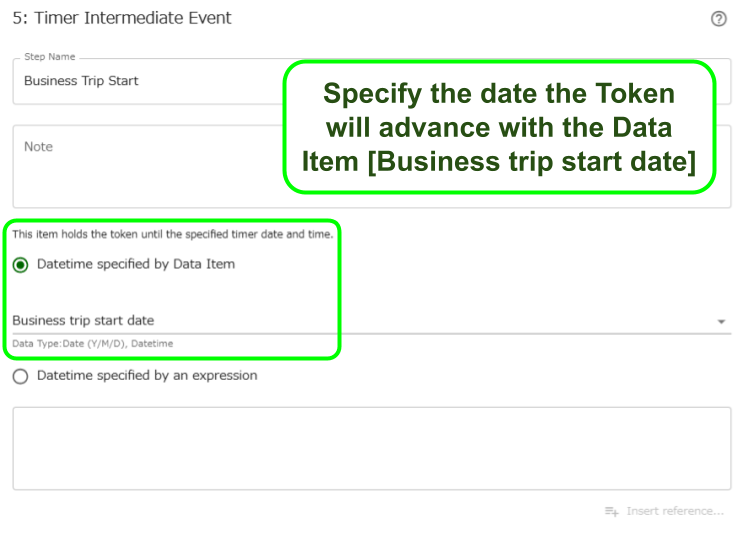
After the “Business trip start date”, the token proceeds to the Report Task. This prevents the Report Task from entering the applicant’s My Tasks list before the trip begins.
To specify the timer with a Data Item, either of the Date-type or Datetime-type is used. When the Date-type is used like in this example, the timer starts operating at 00:00.
Report Deadline Settings
By configuring a deadline in the Human Task’s settings, you can force the task to be terminated once a specified date/time has passed, or have a notification sent to the assignee. Here, we’ll set the deadline to 7 days after the Business Trip End Date and send a notification once the deadline has passed.
In the Deadline setting, choose [From 00:00 of (date type)], specify Business Trip End Date as the reference, and set it to [7 days later]. This makes the task deadline 7 days after the Business Trip End Date. (The deadline time will be 00:00 on the 7th day after. If you want to allow submission through the end of the 7th day, specify [8 days later] instead.)

The data items you can use as a reference are Datetime or Date-types (excluding month/day-only types). If you specify a Date-type, “00:00 of that day” becomes the starting point (if you leave the [days later] dropdown blank, the deadline becomes 00:00 of the specified date as-is).
If you want to specify things in more detail, turn on [Expression] to display and edit the settings as a SpEL expression. For functions you can use when calculating Date/Datetime type data items, refer to R2271: Auto-Population of Date-type/Datetime-type Fields (Data Configuration Expressions).
If you set the deadline action to “No action”, a notification that the deadline has passed will be sent once the deadline is exceeded, but the task can still be processed even after the deadline. (Along with the overdue notification, the deadline column for that task in “My Tasks” will be displayed in red text, but the task itself is not deleted.)
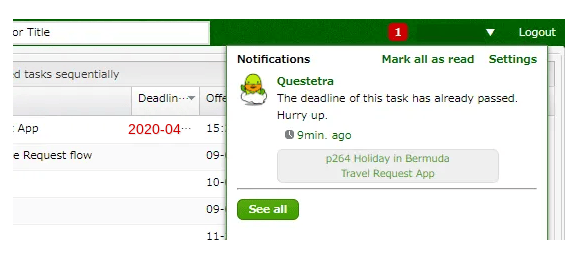
With the settings so far, we’ve implemented the entire process from trip request to trip report as a workflow app.
How do I turn off the Confirmation Task notification after 3 days?
By the way, depending on the type of business the Task to confirm the contents of the report may be unnecessary. If such a task is left unattended your My Tasks list will accumulate more and more items unless the App handles it.
To deal with these situations let’s make the task abort 3 days after the task creation date using the deadline settings in the Human Task. Set the deadline for the Confirmation Task as follows.
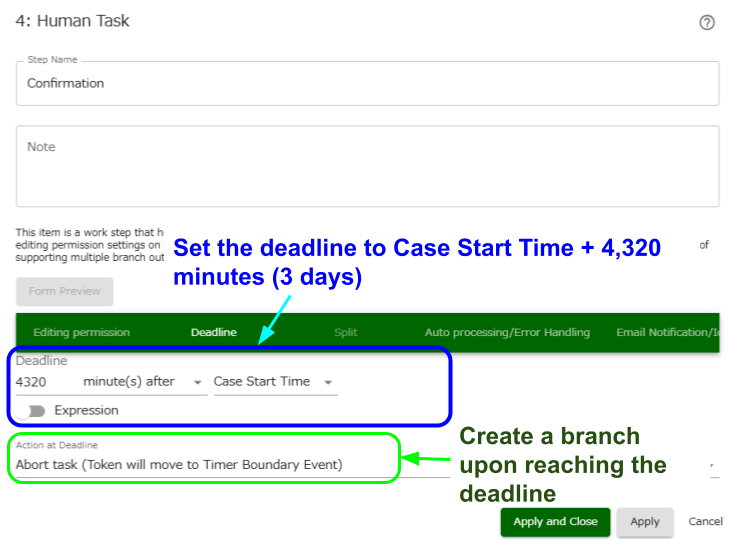
If Action at Deadline is set to Abort task, a timer boundary event is added to the Human Task icon. Upon reaching the deadline the token will go there.
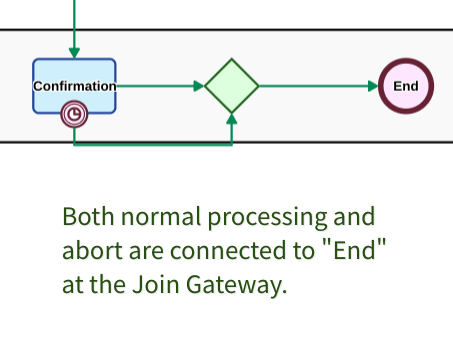
With this configuration the token goes to the Join Gateway then moves to the End Event regardless of whether the supervisor finishes the Task or leaves it for 3 days. When the Task is aborted the Task notification disappears, so the Confirmation Task disappears from the My Tasks list of the supervisor three days after creation.
In this article the sample App itself has been concise to provide an easy-to-understand idea of how to use the Timer Intermediate Event and deadline settings. If you want to control the date and time of the token’s flow try applying this article.