
2022-01-06: Published.
2023-10-19: Added how to configure with the “OAuth2 Client Credentials” Type, which was added in Ver. 15.1.

Some modeling elements in Questetra can send HTTP requests, and in this way you can use them to call and utilize the REST APIs which are provided by many services.
Use one of the following modeling elements of Questetra to send an HTTP request.
- Available in Advanced edition and above
- Automatic processes included as standard
- Hereinafter these are referred to as “Built-in auto-step” in this article
- Automatic processing to link with external cloud services such as Gmail: Get Mail, Box: Upload Files, etc.
- Automatic processes included as standard
- Available in Professional
- Throwing Message Intermediate Event (HTTP)
- Script Task
- Automatic process that can be used by adding a definition file (Addon-XML)
- Hereinafter these are referred to as “Add-on auto-step” in this article
- Google Docs: Document, Replace All, Google Slides: Page, Duplicate, etc.
Some services that provide REST APIs require authentication when calling the API, and Questetra allows you to send the information required for authentication when sending HTTP requests by registering the information required as HTTP Authorization Settings.
1. Add HTTP Authorization Settings
Authorization settings can be added for each Workflow application. To add authentication settings, click [▼App] > [HTTP Authorization Settings] on the Workflow application details screen to display the settings screen. (It can also be displayed by clicking the [Settings] button on the settings screen of the Step that uses the authorization settings.)
If there are any authorization settings that have already been added they will be listed. Click the [Add] button to go to the new authorization settings screen.
There are three types of HTTP authorization settings:
- OAuth2
- Token Fixed Value
- Basic Authentication
Select and configure one of the types according to the specifications of the side that calls the API.
The following sections explain how to configure each type.

1-1. OAuth2 Type
There are several types of OAuth2 (authorization flow), but the OAuth2 type corresponds to the authorization flow where grant-type is an Authorization Code.
- In the OAuth2 type, “Authorization: Bearer {managed AccessToken}” is added to the Authorization header on HTTP requests.
a. Preparation on the side of the service to be called
To use the Authorization code, Questetra must be registered as an OAuth client on the other service. Therefore, pre-register on the other service first. It depends on the target service, but in most cases you will need to create an application that can accept API requests in the service.
When configuring the application, you will be asked to enter the Callback URL.
Questetra’s callback URL is as follows (displayed in the HTTP Authentication Settings screen).
- https://s.questetra.net/oauth2callback
- Trial mode (free trial): https://f.questetra.net/oauth2callback
After completing the configuration of the application by specifying the callback URL, you will be able to see the following on the other service side.
- Client ID
- (sometimes referred to as “consumer key” or “APP ID”)
- Client Secret
- (Sometimes called “client secret code”, “consumer secret,” etc.)
Register these values in the Questetra authorization settings.
b. Adding HTTP Authorization Settings on the Questetra Side
On the HTTP Authorization Settings screen click the [Add] button to open the New Authorization Settings screen, and specify [OAuth2] (default).
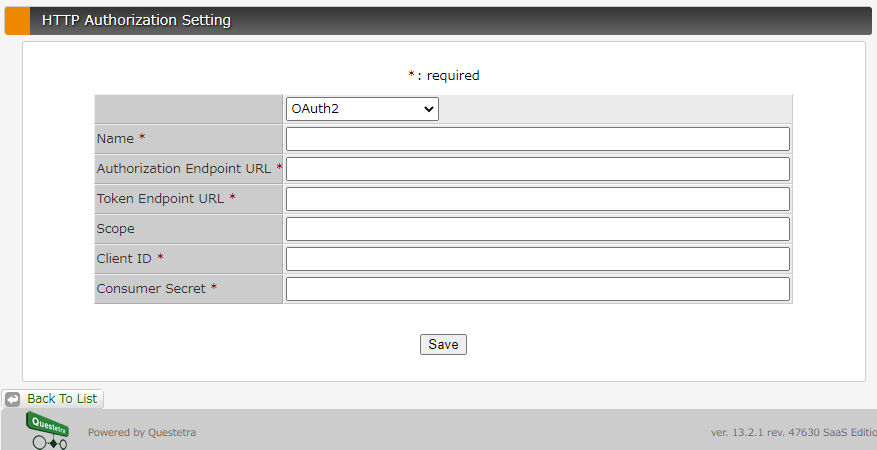
| (setting name) | (contents to be entered) |
| Name* | Any setting name you like is OK, and will be used later to specify the setting in the Step settings. |
| Authorization endpoint URL* | Enter the URL by referring to the manual of the other service. |
| Token endpoint URL* | Enter it referring to the manual of the other service. |
| Scope | Varies depending on the peer service and the API to be called. May be left unspecified. To specify multiple scopes, separate them with a space. |
| Client ID* | Enter the value you received in “1. Preparation on the other service side to be called”. |
| Client Secret* | Enter the value that you checked in “1. Preparation on the other service side to be called”. |
Enter the necessary information and click [Save] to add the authorization settings with the specified setting name and display them in the list screen.
The next step is to obtain a token which is used when making HTTP requests. Click the “Get Token” button in the ‘Have a token?’ column on the far right to go to the login screen for the other service. (If you are already logged in, you will skip to the next screen.) Once you have completed the login, you will be prompted for authorization to access the service.
- Depending on the service on the other side, a message such as “The connection is from an untrusted client” may be displayed when granting access
- There is no problem with the procedure, please authorize and get the token
When the process is completed successfully, the token will be retrieved and the display will look like this.

If the token acquisition fails, please check if there are any flaws in the settings. If there is no flaw in the settings, it is possible that the authorization flow is not supported by Questetra. Please check the document about the other service’s OAuth communication again.
1-2. OAuth2 Client Credentials Type
The [OAuth2 Client Credentials] Type corresponds to authentication flows whose grant-type is Client Credentials.
a. Preparation on the side of the service to be called.
For Client Credentials, Questetra must be registered as an OAuth client on the other service.
b. Adding HTTP Authorization Settings on the Questetra Side.
Specify the new settings in the [HTTP Authorization Setting OAuth2 Client Credentials] screen, which is opened by clicking the [Add] button in the [HTTP Authentication Settings] screen.

(Fields with * are mandatory)
In the [OAuth2 Client Credentials] Type, authorization requests are not sent to authorization endpoints, so there is no setting for authorization endpoint URLs. The rest of the settings are the same as for the 1-1, [OAuth2] type, so please refer to that section. After entering the necessary information and clicking [Save], the authorization settings with the specified setting name are added and displayed on the list screen.
When the settings are completed, the following screen appears.

Unlike Authorization Code Authentication, this authorization type does not carry out user authentication, only client application authentication. This authorization type sends token requests to token endpoints and receives access tokens. It is not necessary to obtain a token in advance. (Note that token requests are supported for parameter types, but not for types using Authorization headers.)
1-3. Token Fixed Value Type
Depending on the service on the other side, a token (equivalent to the one eventually obtained by OAuth2 as described above) may be issued directly in the application configuration screen.
Once the token has been obtained, click [Token Fixed Value] to add the authorization settings. When you select [Token Fixed Value] from the drop-down menu on the screen for adding a new authorization setting, the input screen will change to the one shown below.
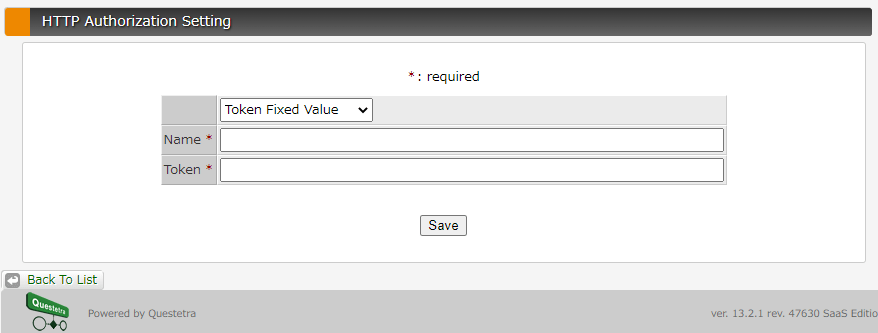
Specify the setting name and enter the obtained token, then click [Save]. When the authorization settings are added to the list, the configuration is complete.
- For the Token Fixed Value type, “Authorization: Bearer {configured string}” will be added to the Authorization header on HTTP requests.
1-4. Basic Authentication Type
This authentication method uses an account ID (user name, email address, etc.) and password. Select [Basic Authentication] from the drop-down menu on the new authorization setting screen, and the screen will change to the input screen shown below.

If the API on the other side allows the use of Basic Authentication it can be used, but it is not as secure as OAuth2. It is recommended to use OAuth2 if possible.
Note that even with OAuth2, if grant-type is set to Client Credentials, you can use the [Basic Authentication] type authorization setting to send the Client ID and Secret.
2. Using HTTP Authorization Settings
Each modeling element Refers to [HTTP Authentication Settings]. The method of reference depends on the modeling element.
2-1. Throwing Message Intermediate Event (HTTP)
If you turn on the option to Set Authorization header in the [Header] tab of the item’s Settings screen, you will be able to select the name of the authorization setting.
Related Documents
2-2. Script Task
With the following code, you can send an HTTP request using the Authorization setting.
let request = httpClient.begin(); // HttpRequestWrapper
request = request.authSetting( "XXX_AUTHORIZATION SETTING NAME_XXX" );
Related Documents
- R2300: Java Classes available in Script Task
- authSetting samples (script for service task definition (Addon-XML))
2-3. Add-on auto-step
This is specified by selecting the name of the Authorization Setting in the setting item labeled “Select Authorization Setting” in the item’s setting screen.
- Some of them have different notations, such as “Please select the communication permission setting (OAuth2)”.
- Some settings require you to enter the name of the setting instead of selecting it.
Related Documents
- In Basic Authentication, “Authorization: Basic {BASE64-encoded username:password}” is added to the Authorization header during HTTP requests.
Appendix
A-1. HTTP Authorization Settings in the Built-in auto-step
In addition to the aforementioned method of adding authorization settings, the Built-in auto-steps have a setting screen that allows you to use OAuth2 authentication settings more easily.
- To use this method, you need to have System Administrator Privileges.
Click [Set up Setting] on the settings screen of the automatic Step to open the screen showing pre-registered authorization settings. Since your Workflow Platform (Questetra) is already registered as OAuth client on the other service, you don’t need to add settings for OAuth client individually.

Simply add the authorization settings for each token you wish to acquire, and your configuration is complete. After registering the settings, follow the same procedure as described above to obtain the tokens.
A-2. Using HTTP Authorization Setting
Specify by selecting the name of the Authorization Setting as in the Add-on auto-step.
Normally HTTP Authorization Settings are configured for each workflow application, but in the Built-in auto-step OAuth clients are registered in the workflow platform in advance, and authentication settings are shared among multiple applications.
For example, Mr. B can use the Authorization Setting (acquired token) set by Mr. A in another application. When an HTTP request is sent from Questetra, the API is accessed as the user who was authenticated when acquiring the token, so be careful when using it.
For this reason, please pay attention to security and privacy issues when multiple people are working on the design of a workflow application. Also, to avoid misuse of authentication settings, please use easily identifiable names for the settings.
A-3. Shared Scopes of HTTP Authorization Settings
When utilising HTTP Authorization methods, there are various scopes of use that can cover individual workflow apps, multiple apps, as well as those associated with users. These are explained in further detail in this article, but can be summarised by the following table.


