
There is a new article about this content

Hi there,
A common example of system integration is to call the REST API of another service by sending an HTTP request from Questetra BPM Suite. Since many APIs use OAuth2 as their authentication method, I’ll describe how to run Questetra as an OAuth2 client in this article.
You can send an HTTP request using one of the following modeling elements via Questetra BPM Suite:
- Throwing Message Intermediate Event (HTTP)
- Script Task
- Service Task definition (Add-on XML)
- Any HTTP request that is defined in OAuth2
Although there are several types of OAuth2, if you use Authorization code as its grant-type Questetra can support it just by having some settings configured.
2. Preparing the partner service to be invoked
3. Settings on the invoking side (Questetra)
4. Configuring modelling elements for OAuth connection
5. Examples of grant-types other than Authorization Code
1. Overview of the procedure
The overview of the settings procedure is as follows.
- Preparing the partner service to be invoked
Setting up using Questetra’s Callback URL, obtaining a Client ID and Secret - Settings on the invoking side (Questetra)
Set up and obtain a token using the partner service’s endpoint URL and the Client ID and Secret - Settings in Questetra for invoking API
Setting up using the OAuth token that has been obtained
2. Preparing the partner service to be invoked
On the side of the partner service to be invoked, the client’s registration in advance is required (sometimes referred to as App registration).
In this case, Questetra’s callback URL is required (sometimes referred to as the “redirect URI”).
- Workflow platforms of Basic / Advanced / Professional
→ https://s.questetra.net/oauth2callback - Workflow platforms of Trial of each edition (Free)
→ https://f.questetra.net/oauth2callback
When you complete the registration, as the Client ID and Client Secret are displayed, make a note of them (they may be called Consumer Key or APP ID / Client Secret Code or Consumer Secret, etc.).
3. Settings on the invoking side (Questetra)
First, Select OAuth 2.0 Setting in the ▼ App drop-down menu on the App detail screen
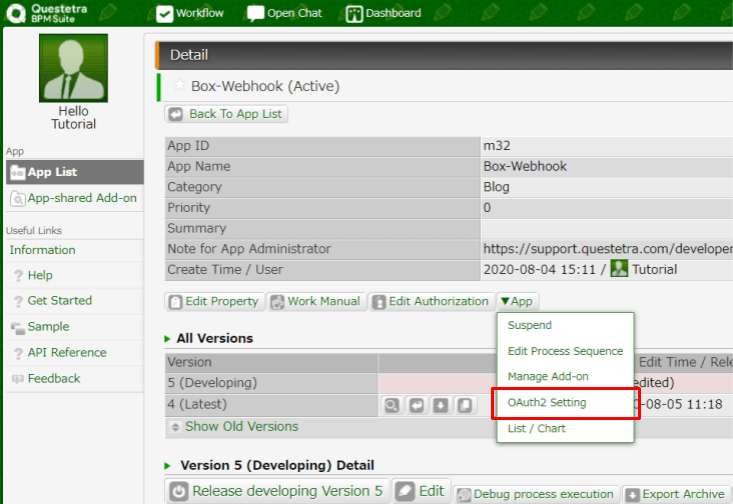
Click on the [Add] button to open the details settings screen. (You can confirm the Callback URL in this screen.)
Enter each item and click on [Save].
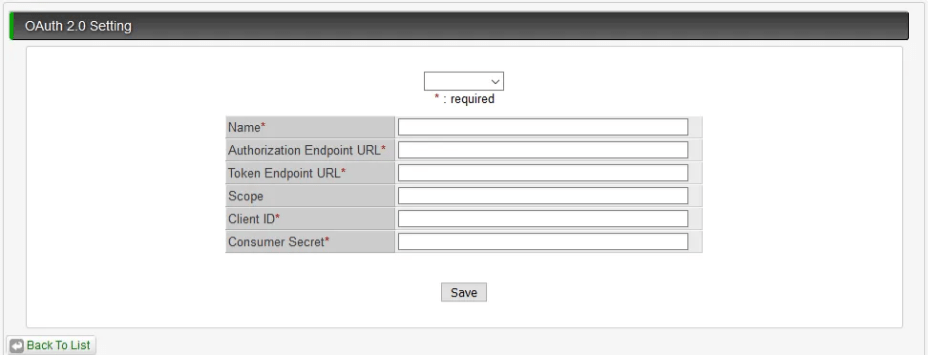
| Item name | Value |
|---|---|
| Config Name | Can be any name you want. To be used for designation later. |
| Authorization Endpoint URL, Token Endpoint URL | Enter by referring to the manuals of the partner service |
| Scope | It depends on the partner service and the calling API. There are cases where it is not specified. Separate with a space in case of multiple names. |
| Client ID, Consumer Secret | Enter the aforementioned notes you made when registering to the partner service. |
Once you have saved the settings click on the “Get token” button; you will be asked to log in the service (if you have already logged in to the other party’s service using your browser, the login screen is not displayed). After you log in to the service, you will be requested to authorize access to the resource. If you are successful you will see the following display.

If you get an error here please check if there are any incomplete settings. If the settings are all correct there is a possibility that the authorization flow is not supported by Questetra, so please check the OAuth communication documentation of the other party’s service.
4. Configuring modelling elements for OAuth connection
The OAuth token obtained above is used by specifying it in the following modeling elements.
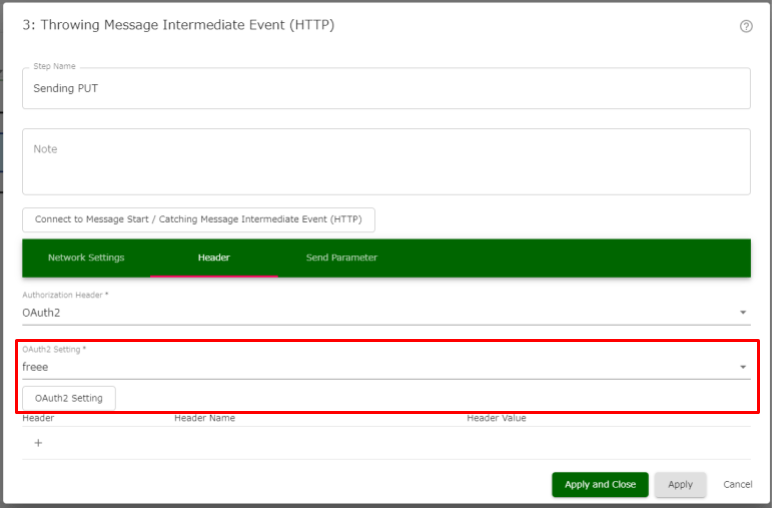
4.1. Throwing Message Intermediate Event (HTTP)
In the Header tab select the Authorizaton Header OAuth2 and specify the name of the OAuth2 you set in the Section 3.
You can send an HTTP request using an OAuth token.
4.2 Script Task
The following code retrieves the token obtained in OAuth2 Configuration and sends an HTTP request:
const token = httpClient.getOAuth2Token( XXX_OAuth Config Name_XXX );
httpClient.begin().bearer(token);
4.3. Service Task definition (Add-on XML)
The setting item name is specified by the OAuth2 communication permission setting name, etc. (the config item name is just an example as it depends on the specification of the Service Task definition (Add-on XML)).

5. Examples of grant-types other than Authorization Code
If the OAuth2 grant-type that is available on the other service is password/client _ credentials, you can use a Script Task to retrieve the token. To find out which grant-type is supported by the other party’s service please refer to the document of the service you are using.
In either case, you have to register Questetra as an OAuth2 client on the other side (see Section 2).
5.1. Example of grant-type: password
The following code is a sample with which you send a request to API.
You can change the expressions in the “{}” depending on the other service and settings.
const clientId = "{ClientID}";
const secret = "{Client secret}";
let accessLog = "";

//Retrieve the token
const uriToken = "{Token endpoint URL}";
const response = httpClient.begin()
  .formParam( "grant_type", "password" )
  .formParam( "client_id", clientId )
  .formParam( "client_secret", secret )
  .formParam( "scope", "write read follow" )
  .formParam( "username", "{Login username}" )
  .formParam( "password", "{Login password}" )
  .post( uriToken );
accessLog += "---POST request--- " + response.getStatusCode() + "\n";
accessLog += response.getResponseAsString() + "\n";
const oauthTokenObj = JSON.parse( response.getResponseAsString() );
const oauthToken = oauthTokenObj.access_token;
accessLog += "oauthToken: " + oauthToken + "\n";

//Send a request to API(in the case of POST request)
const uriExecute = "{API endpoint URL}";
const responseExecute = httpClient.begin()
  .bearer( oauthToken )
  .formParam() // Set in accordance with API
  .post( uriExecute );
accessLog += "---POST request--- " + responseExecute.getStatusCode() + "\n";
accessLog += responseExecute.getResponseAsString() + "\n";

engine.setDataByVarName("q_accesslog", accessLog);
5.2. Example of grant-type: client_credentials
The following code is a sample when you retrieve the token (*you can send a request to API with the code in the same way as grant-type: password).
You can change the expressions in the “{}” depending on the other service and settings.
const clientId = "{ClientID}";
const secret = "{Client secret}";
let accessLog = "";

//Retrieve the token
const uriToken = "{Token endpoint URL}";
const response = httpClient.begin()
  .formParam( "grant_type", "client_credentials" )
  .formParam( "client_id", clientId )
  .formParam( "client_secret", secret )
  .post( uriToken );
accessLog += "---POST request--- " + response.getStatusCode() + "\n";
accessLog += response.getResponseAsString() + "\n";
const oauthTokenObj = JSON.parse( response.getResponseAsString() );
const oauthToken = oauthTokenObj.access_token;
accessLog += "oauthToken: " + oauthToken + "\n";

//Send a request to API
//The following is the same as grant-type: password

