各プロセスを見分けるために「件名」は重要です。適切に件名が設定されていれば、タスクの割当て通知を見ただけで「何を依頼されたのか」「どのタスクを割当てられたのか」といったことが簡単に分かりますね。
適切な件名を設定するためのアイデアとして、ワークフローアプリ側で件名を自動設定するというものがあります。データ項目を用いて、そのプロセスが何を取り扱っているかを件名に表現すれば、ユーザが丁寧に件名を入力しなくても分かりやすい件名が設定できます。
- 件名に含まれていてほしい内容が、必ず含まれるようになる!
- フォーマット(内容の順番や書式)が必ず揃うようになる!
例えば物品購入依頼のプロセスでは品物の名前、ブログ記事の作成依頼ではタイトル案を件名に埋め込めば、処理担当者にタスクの内容が伝わりやすいでしょう。そして件名のフォーマットが揃っていれば、特定のプロセスを探したい場合に、件名が大きな助けとなることでしょう。
このチュートリアルでは「データ更新」を用いて、プロセスの件名を自動で次のようなフォーマットに整えます。

ワークフロー図
新規アプリを作成し、まずは次のワークフロー図を作成してください。

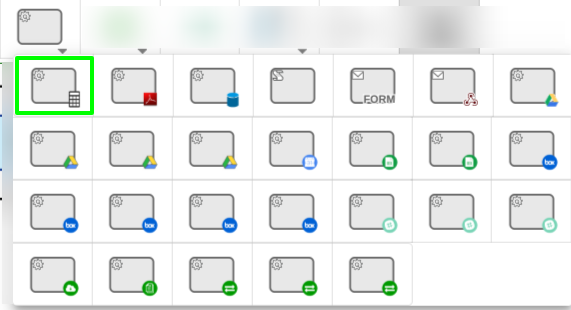
データ更新オブジェクトは 自動処理タスクの パレットに入っています。
「データ更新」はデータ項目の値を操作するためのオブジェクトです。これを使用して、先に挙げたフォーマットに件名を合わせる操作を行います。「開始」タスクで日時型データ項目(例: 経費の立替をした日)の入力を受付け、「確認」タスクで操作後の件名を表示するというアプリになります。
データ項目設定
データ項目は次のものを用意してください。
| データ項目名 | データ型 | フィールド名 | 備考 |
| 件名 | – | ||
| 日付 | 日付型・年月日 | q_date |
データ編集許可は次のように設定してください。
| 「開始」 | 「確認」 | |
| 件名 | 表示のみ | 表示のみ |
| 日付 | 編集可 | 表示なし |
「データ更新」設定
「データ更新」は、指定したデータ項目に値や式を保存するオブジェクトです。次のように設定してください。

今回は件名の文字列を操作するので、設定対象は「件名」のデータ項目になります。そしてテキストボックスには、先に挙げたフォーマットを表す式を入力します。
[テスト]#{processInstanceInitQuserName} – #{#dateFormatter.format('yyyy/MM', #q_date)}
「データ更新」はデータ埋込に対応しているので、適宜「データの挿入を参照する…」メニューを使用してください。「日付」については、dateFormatter の Format を用いて yyyy/MM(例: 2020/04)の形式に整形して保存しています。
「データ更新」と代入式の書式について、詳しくは以下のリファレンスを参照ください。
- データ更新 – Questetra Support
- R2272: EL式による文字列としての出力(データ設定式)– Questetra Support
- M404: “取引先社名” が[件名]に途中セットされるように設定する(文字列の自動結合例) – Questetra Support
アプリの設定は以上です。編集の終了・リリースして動作を確認すると、例えば次のように件名が自動設定されるはずです。

件名の「初期値」で自動設定する
「データ更新」を用いずに、「件名」のデータ項目の初期値の設定により件名を自動設定する方法もあります。ワークフロー図に「データ更新」を配置しなくていいので簡潔に設定できますが、初期値による設定なので、ユーザからの入力を件名に反映させたり、プロセス中の条件によって件名を変えるといった柔軟な処理はできません。
例えば、日付型データ項目の代わりに「プロセス開始日時」を埋め込む場合、次の値を「件名」の初期値に設定することで、[テスト]{プロセス開始ユーザ} – {プロセス開始日時の年月} を件名に自動設定することができます。
[テスト#{processInstanceInitQuserName} - #{#dateFormatter.format('yyyy/MM', processInstanceStartDatetime)}このチュートリアルを参考に、アプリに合わせて様々なフォーマットを実装してみてください!