
In this article we will describe the behaviour and functions of Splits in the Workflow.
What is a Split?
Many workflows will follow a single path.
A Split is when one Flow branches into two or more divergent Flows, allowing a Process to have multiple possible outcomes. The path a Process takes can either depend on the data that has been input to the Process, or the choice of the operator.
Usually where a Flow branches into multiple paths, a Process will take one path or another according to the conditions of the Split. However, in some cases it is possible that a Process satisfies more than one of the specified conditions, in which case it can split into multiple Tokens* and follow parallel Flows concurrently.
* The Token is the indicator of the current active Step in the Process
M203: Single-Selection Branch and Concurrent Parallel Processing
Modelling Elements and Gateways
Below we will look at the modelling elements and circumstances which allow each situation to occur.
| Split | Human Task | XOR Gateway | OR Gateway | AND Gateway |
| Merge | Merge Gateway (XOR) | Merge Gateway (OR) | Merge Gateway (AND) | |
Token Does Not Split
The majority of Processes will have one Token, meaning that there is only one active Step at a time in the Process.
Human Tasks
- These are capable of creating Splits when there are two or more Flows leaving the Human Task. Under the Split tab in the Human Task properties window there are two options to choose from.
- The token moves to the Destination that a user selects: the Task Operator is able to click labelled buttons to select the branch they wish to follow.
- The token moves to a Destination according to the satisfied condition: only a “Finish Task” button will be displayed and the Token will move along one branch depending on which condition is satisfied.
XOR Gateway
- This will automatically select a branch according to a satisfied condition, much like the option in the Human Task “The token moves to a Destination according to the satisfied condition”, but without a Task being created for the User.
Token Splits
The modelling elements below allow the Token to split so that multiple branches of the same Workflow are processed concurrently as part of the same Process.
AND Gateway
- The Token will move to all Flows that exit from this gateway. No conditional settings are required.
OR Gateway
- The Token will move to all Flows that satisfy the specified condition. Unlike the XOR Gateway multiple conditions may be satisfied at the same time allowing the Token to split.
Flow Structure
When splitting a Token into multiple parallel paths there are two possible outcomes.
Merging after a Split
Firstly, Tokens which have split into parallel paths may merge into a single token by those paths meeting at a Merge Gateway, and in this situation all Tokens must reach the Merge Gateway before the Process can proceed. Where the tokens do not diverge, they follow one of the paths, and after the Merge Gateway they follow a single path. There are three types of Merge Gateway, and the corresponding type is used according to the type of Split.
Parallel End Events
Under this structure multiple paths are split by a branch and each parallel path may reach its own separate End Event. In cases where the Token does not diverge, the Process terminates when the Token reaches an End Event. However, when Tokens do diverge the Process only ends when all Tokens reach their respective End Events, so it is possible that one Token may reach an End Event while other Tokens on parallel paths remain active.
When parallel paths do not merge and proceed to their respective End Events it is possible that a [Terminate End Event] may be used. In this case, when Tokens are split and one of them reaches a [Terminate End Event], all Tokens in the Process will be terminated, even if there are unfinished Tasks.
Loops
A loop is a Workflow structure where a path is connected to a previous Step allowing that Step to be repeated. Any loop structure may contain a branch.
In cases where the Token does not split the same action can be processed multiple times following the flow of the Token. You must be careful when tokens diverge, that is, when using Parallel (AND) Gateway or Inclusion (OR) Gateway for branching in a loop structure. A structure in which the split tokens are further split is prohibited because the tokens can split indefinitely, resulting in a definition error. When tokens are split, configure a loop individually or set the loop structure to connect to the previous Step after merging.

Split Conditions
How to Specify Conditions
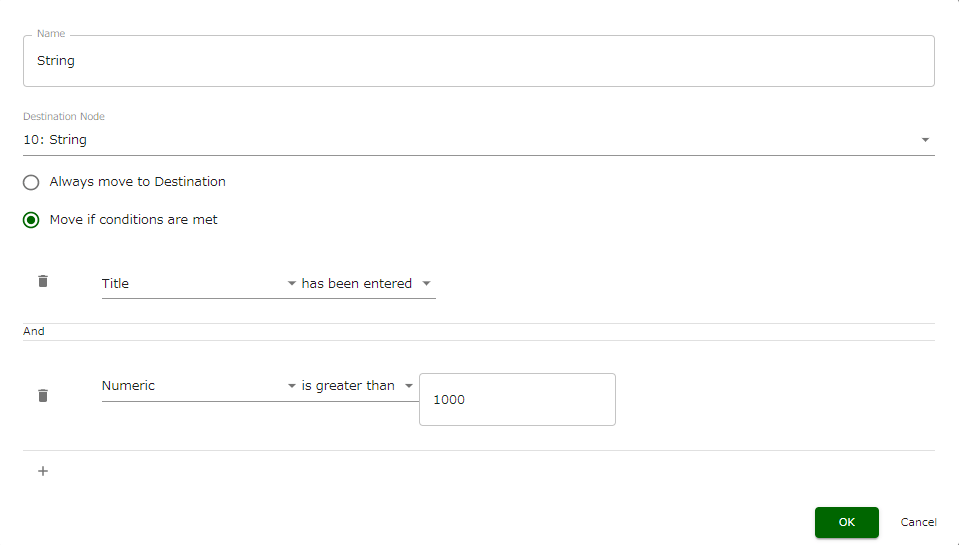
Conditions can be set in the properties window of XOR and OR Gateways, or in the case of Human Tasks, in the properties window under the Split tab. Each condition can be edited by clicking the pencil icon to open the condition settings window. Here you can select the Destination Node, i.e. the next Step the Token will move to upon the condition being satisfied, and whether that Node will be the Default Flow.
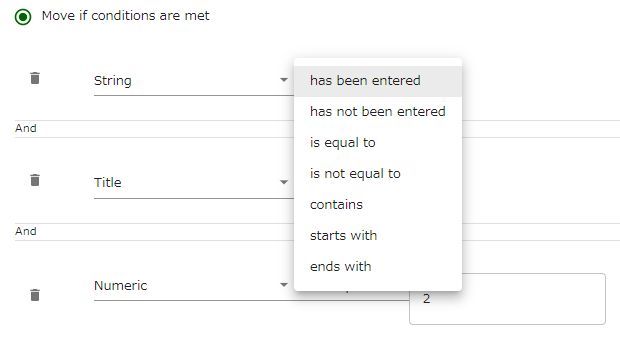
It is possible to create multiple requirements for each condition by clicking the + button at the bottom of the window, and for each one you are able to select a Data Item, a qualifier such as “starts with” or “is equal to” and a value.
So for example, in a Workflow which handles expense reimbursement requests there may be a default flow which is directed to a Task in the General Affairs Swimlane, and a condition stating “Amount is greater than 1,000” which will be directed to the senior manager Swimlane for higher level approval.
Default Flow
When setting conditions there is always a Default Flow condition at the bottom of the list which cannot be deleted. The Default Flow is the path that the Token will take only in the event that either none of the conditions are met.
This allows the Process to proceed if there is incomplete data, and avoid getting stuck at a Step where it is impossible to move forward.
Although the Default Flow cannot be deleted, you may edit the properties so that it will direct the Token to the desired destination node. Setting conditions for the Default Flow is unnecessary since the condition will always be that no other conditions have been met.
AND Conditions
It is possible to make the requirement for a condition more specific by adding multiple conditions on the same branch. For example, “Title has been entered” and “Numeric is greater than 1000”. If both of these conditions are satisfied then the destination node will be reached.
OR Conditions
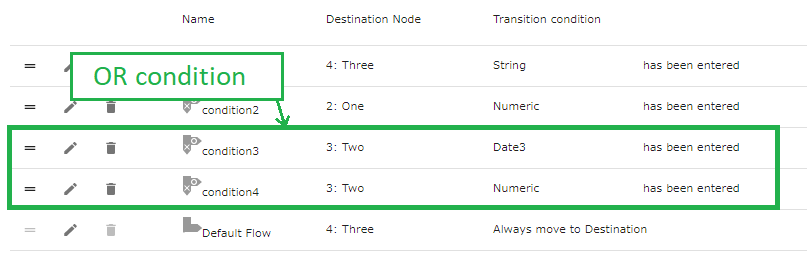
You can also create OR conditions by adding two separate conditions that have the same destination node. In this case if either one of the conditions is met but not the other, then the destination node will still be reached.
For more information on splitting by conditions please refer to the following article:
Your first step of Questetra BPM Suite / Chpt.4: Splitting by Condition
Examples of Use
1. XOR Gateway and Human Task
In the following example we will look at the use of Splits in a practical situation. In the Approval Request flow below, the Task “2. Approve” is set to give the approver the option to either approve the draft plan, or to send it back for reworking.

In this case the split condition is determined by the approver, so the Split Type is set to “The token moves to the Destination that a user selects.”, and the Button Labels are set to “Approve” for the branch that continues to the next Step, and “Send back” for the branch which returns to the Step “1x. Rework” in the Applicant Swimlane.
The text set in the Button Label is displayed on the completion button in the Operating screen of the “2. Approve” Step, and the destination of the branch depends on the button the approver clicks.

Similarly, the 1x. Rework Step has the option for the User to select the destination; either to resubmit or to withdraw the application.
If the Approver approves the draft the Token will move to an XOR Gateway which will automatically select which of the outgoing branches to proceed down based on the defined conditions.
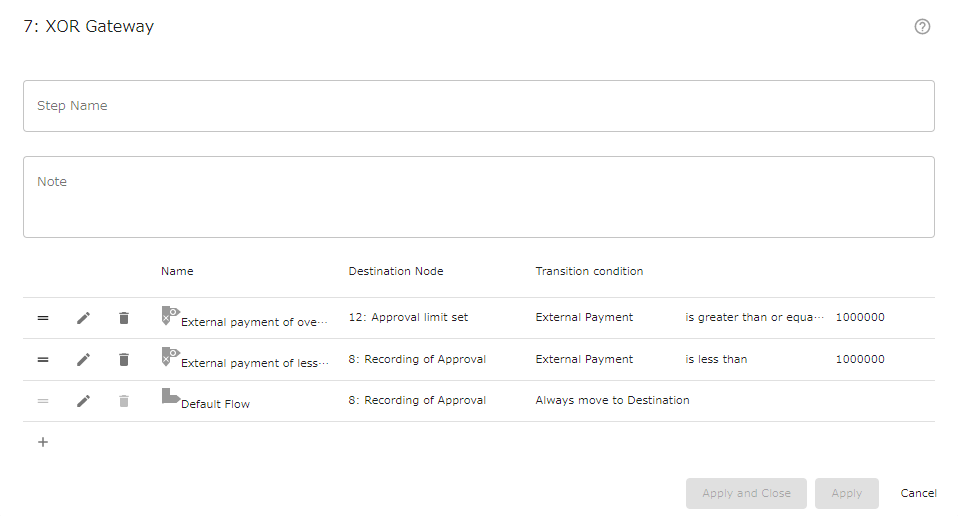
As the above screenshot shows that the conditions in the XOR Gateway checks the Data Item “External Payment”, and determines the output branch depending on whether the entered value is greater than or less than 1,000,000. In the event the amount is above the threshold limit the Token will move to another Task for further approval.
As always, there is a Default Flow set up which cannot be deleted, but in this scenario there should never be a situation where that is necessary.
2. AND Gateway
In the Subcontracting Flow example below you can see there is an AND Gateway between Steps 1 and 2.

At the AND Gateway the Token will split and continue to both the “2. Presenting draft of the contract” Step and “2. Check Contracts in last 3 years” Step, so Tasks will be generated in the Offered lists of both the Accounting Department and the General Affairs Department’s staff. Once both of these Steps have been completed the split Tokens will merge at the Join Gateway in the Project manager Swimlane.
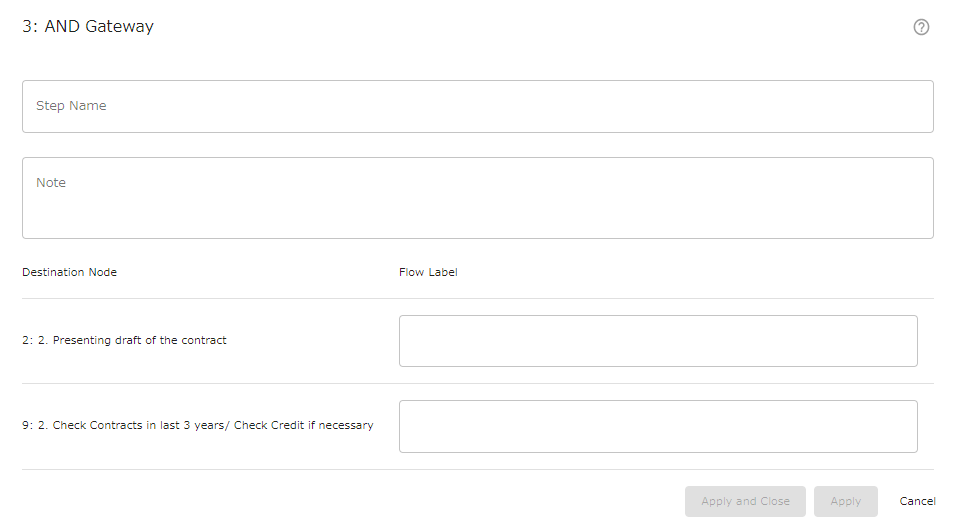
You can see in the AND Gateway properties that there are no conditions, as Tokens will continue along all exiting flows.
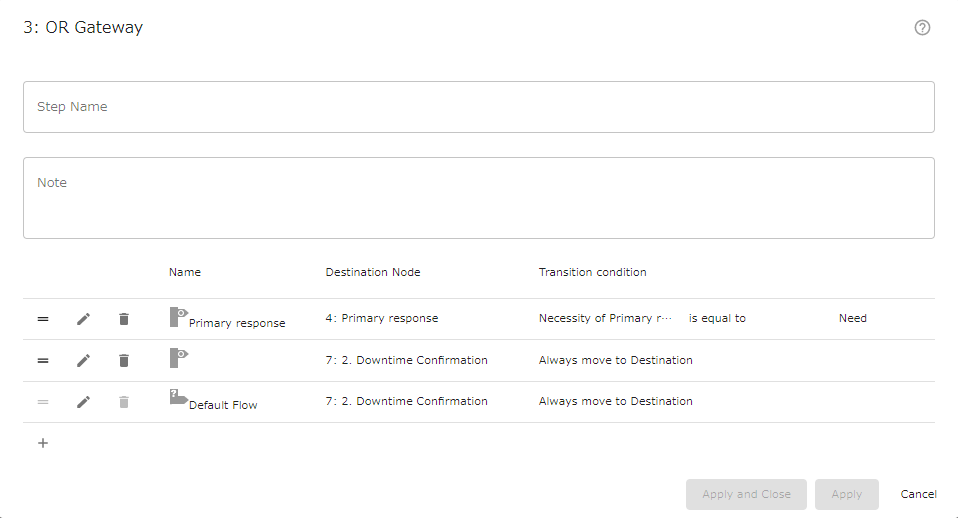
3. OR Gateway
In the following example, which is for handling SLA claims, an OR Gateway follows the first Step “1. Confirm the Claim”. This Gateway does include conditions, but it is still able to output multiple Tokens.

You can see in the properties below that a Token will always move to the second Human Task “2. Downtime Confirmation”. However, it is possible that a Token may also move to the [Throwing Message Intermediate Event (email)] if the Select-type Data Item “Necessity of Primary response” is set to “Need”.
If the conditions below were set so that only the Default Flow moved to “2. Downtime Confirmation”, then the Token would not move to that node in the event that one of the other conditions were met. In this instance, a condition has been set which is not the Default Flow, but does specify the condition to always move to “2. Downtime Confirmation”. With these settings the Token will move to “2. Downtime Confirmation” under all circumstances, regardless of what other conditions are met.
If you are interested in using any of the example Apps shown above, they can all be found on the page Workflow Apps (Business Templates) where the template files can be downloaded and imported to your Questetra environment.
Related articles:
Your first step of Questetra BPM Suite / Chpt.4: Splitting by Condition
I Hate Such a Workflow – Processing Merely in Order!

